Run Dagger on Amazon EKS with GitHub Actions Runner and Karpenter
Introduction
This guide outlines how to set up a Continuous Integration (CI) environment with the Dagger Engine on Kubernetes using GitHub Actions, Amazon Elastic Kubernetes Service (EKS), Karpenter and Dagger Cloud.
Assumptions
This guide assumes that you have:
- A good understanding of how Kubernetes works, and of key Kubernetes components and add-ons.
- A good understanding of how Dagger works. If not, read the Dagger Quickstart.
- An Amazon EKS Kubernetes cluster with cert-manager, Karpenter, Helm and GitHub Actions Runner Controller (ARC) installed.
- A GitHub account. If not, sign up for a free GitHub account.
- A Dagger Cloud account. If not, sign up for Dagger Cloud.
These steps below may vary depending on your specific setup and requirements. Always refer to the official documentation of the tools and services listed for the most accurate and up-to-date information.
Step 1: Understand the architecture
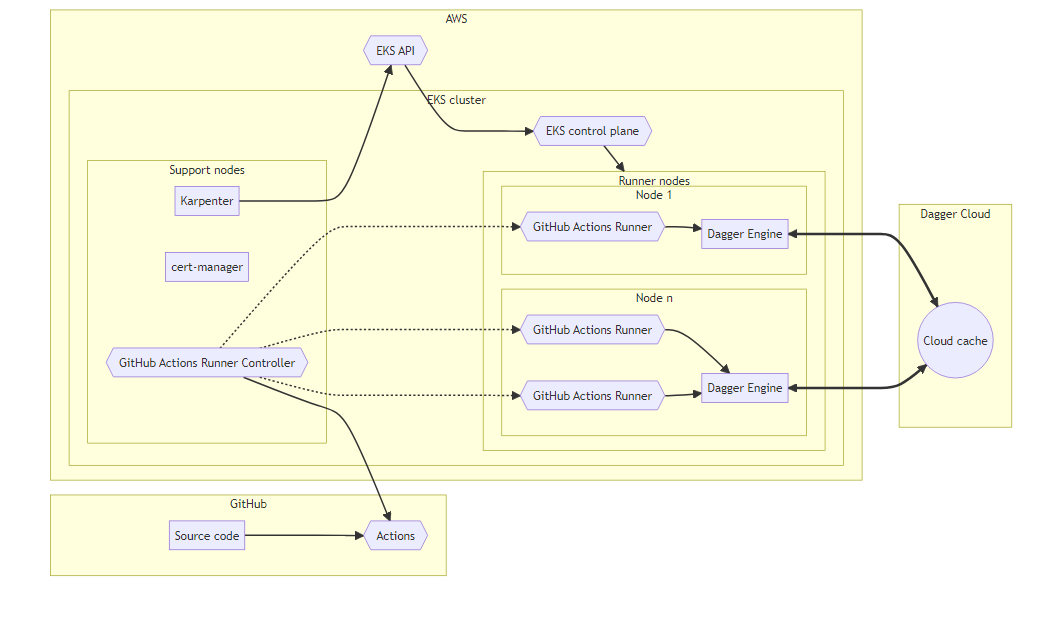
Here is a brief description of the architecture and components:
- The application source code is hosted in a GitHub repository.
- The runner nodes are part of an Amazon EKS cluster.
- GitHub provides the GitHub Actions Runner Controller (ARC), a Kubernetes controller that manages deploying and scaling GitHub Actions runners as Pods in a Kubernetes cluster.
- A Dagger Engine runs on every Kubernetes node where a GitHub Actions Runner is deployed.
- Based on GitHub Actions jobs queued, ARC creates on-demand runners.
- Dagger Engines communicate with the Dagger Cloud to read from & write to the shared cache.
- Karpenter, a Kubernetes-native node auto-scaler, uses the AWS EKS API to dynamically add or remove runner nodes depending on workload requirements.
Step 2: Set up services and components
The next step is to set up the required services and components. Ensure that you have:
- An Amazon EKS Kubernetes cluster with cert-manager, Karpenter and GitHub Actions Runner Controller (ARC) installed.
- A GitHub account
- A Dagger Cloud account, which provides distributed caching, pipeline visibility, and operational insights.
Step 3: Create a set of taints and tolerations for the GitHub Actions runners
Taints and tolerations in Kubernetes are a way to ensure that certain nodes are reserved for specific tasks. By setting up taints on runner nodes, you can prevent other workloads from being scheduled on them. Tolerations are then added to the runners so that they can be scheduled on these tainted nodes. This ensures that the runners have dedicated resources for their tasks.
A sample GitHub Actions runner deployment configuration is shown below.
- Replace the
YOUR_GITHUB_ORGANIZATIONplaceholder with your GitHub organization name. If you do not have a GitHub organization, you can use your GitHub username instead. - This configuration also uses the
DAGGER_CLOUD_ENVIRONMENTenvironment variable to connect this Dagger Engine to Dagger Cloud. ReplaceYOUR_DAGGER_CLOUD_TOKENwith your own Dagger Cloud token.
apiVersion: actions.summerwind.dev/v1alpha1
kind: RunnerDeployment
metadata:
  name: dagger-runner-deployment-2c-8g
  namespace: dagger
spec:
  replicas: 0
  template:
    spec:
      affinity:
        nodeAffinity:
          requiredDuringSchedulingIgnoredDuringExecution:
            nodeSelectorTerms:
              - matchExpressions:
                - key: actions-runner
                  operator: Exists
      dockerEnabled: true
      dockerdWithinRunnerContainer: true
      image: summerwind/actions-runner-dind
      labels:
        - dagger-runner
        - dagger-runner-2c-8g
      organization: YOUR_GITHUB_ORGANIZATION
      resources:
        requests:
          cpu: "2"
          memory: 8Gi
      securityContext:
        fsGroup: 1001
        fsGroupChangePolicy: OnRootMismatch
      tolerations:
        - effect: NoSchedule
          key: actions-runner
          operator: Exists
      env:
        - name: _EXPERIMENTAL_DAGGER_RUNNER_HOST
          value: unix:///var/run/dagger/buildkitd.sock
        - name: DAGGER_CLOUD_TOKEN
          value: YOUR_DAGGER_CLOUD_TOKEN
      volumeMounts:
        - name: dagger-socket
          mountPath: /var/run/dagger
      volumes:
        - name: dagger-socket
          hostPath:
            path: /var/run/dagger
This configuration uses the _EXPERIMENTAL_DAGGER_RUNNER_HOST environment variable to point to the Dagger Engine DaemonSet socket that is mounted into the GitHub Actions runners. This ensures that the runners will use the local Dagger Engine for pipeline execution.
Step 4: Deploy the Dagger Engine DaemonSet with Helm v3
A Dagger Engine is required on each of the GitHub Actions runner nodes. A DaemonSet ensures that all matching nodes run an instance of Dagger Engine. To ensure that the Dagger Engines are co-located with the GitHub Actions runners, the Dagger Engine Daemonset should be configured with the same taints and tolerations as the GitHub Actions runners.
Use our Helm chart to create the Dagger Engine DaemonSet on the cluster:
helm upgrade --install --namespace=dagger --create-namespace \
    dagger oci://registry.dagger.io/dagger-helm
This Dagger Engine DaemonSet configuration is designed to:
- best utilize local Non-Volatile Memory Express (NVMe) hard drives of the worker nodes
- reduce the amount of network latency and bandwidth requirements
- simplify routing of Dagger SDK and CLI requests
Step 5: Test the deployment
At this point, the deployment is configured and ready for use. Test it by triggering the GitHub Actions workflow, by committing a new change to the source code repository. Your CI pipelines will be now connected to your Dagger Engines.
If you don't already have a GitHub repository, clone the repository for the Dagger starter application and add the sample GitHub actions workflow shown below to it. Refer to the inline comments for configuration you may wish to change.
name: Build, test & publish in Dagger on Kubernetes

on:
  pull_request:
    types:
      - opened
      - synchronize
      - reopened
  # Enable manual trigger for easy debugging
  # https://docs.github.com/en/actions/using-workflows/workflow-syntax-for-github-actions#onworkflow_dispatchinputs
  workflow_dispatch:

jobs:
  build-test-publish:
    # runs-on: ubuntu-latest
    # 👆 Uncomment line above & comment line below 👇 if you want to run this on GitHub Runners instead
    runs-on: dagger-runner
    steps:
      # https://github.com/actions/checkout
      - name: Checkout code
        uses: actions/checkout@v3
      # https://github.com/actions/setup-node
      - name: Setup Node.JS
        uses: actions/setup-node@v3
        with:
          node-version: 18
          cache: npm
      - name: Install Dagger CLI
        run: |
          mkdir -p ~/.local/bin
          cd ~/.local
          curl -L https://dl.dagger.io/dagger/install.sh | sh
      - name: Run Dagger pipeline
        run: |
          npm install
          dagger run node ci/index.mjs
Remember to add the ci/index.mjs file containing the Dagger pipeline too (an example is available in the Dagger quickstart). Alternatively, pick your preferred language and adapt the GitHub Actions workflow example above.
To validate that your Dagger Engines are working as expected, you can check your Dagger Cloud dashboard, which shows detailed information about your pipeline executions.
Conclusion
This guide described how to set up a Continuous Integration (CI) environment using Dagger on Kubernetes with GitHub Actions, Amazon Elastic Kubernetes Service (EKS), Karpenter and Dagger Cloud.
Use the following resources to learn more about the topics discussed in this guide:
- CI Architecture Patterns for Dagger on Kubernetes
- Dagger Cloud
- Dagger GraphQL API
- Dagger Go, Node.js and Python SDKs
If you need help troubleshooting your Dagger deployment on Kubernetes, let us know in Discord or create a GitHub issue.