Run Dagger on OpenShift with GitLab Runners
Introduction
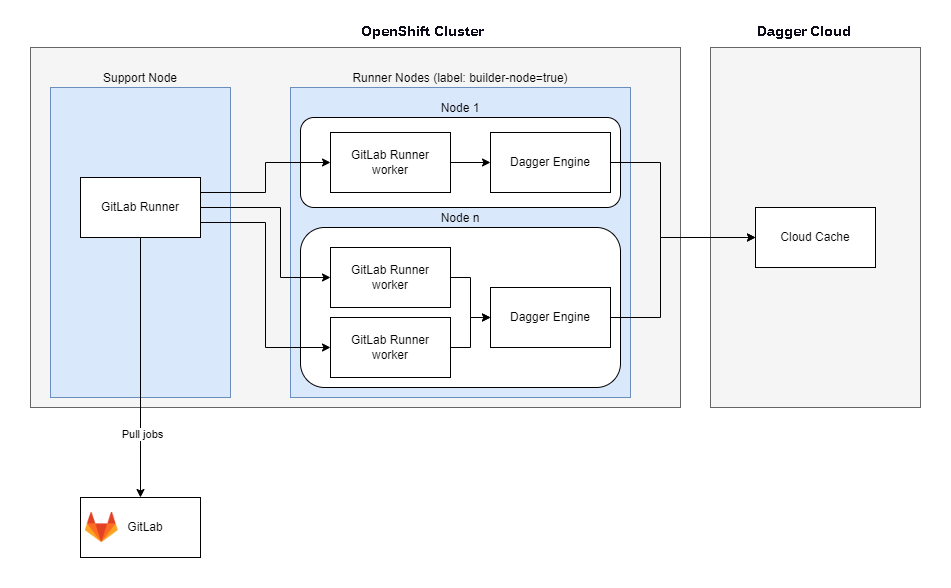
This guide outlines how to set up a Continuous Integration (CI) environment with the Dagger Engine on OpenShift in combination with GitLab Runners. The architecture consists of:
- A Dagger Engine DaemonSet which executes the pipelines;
- A GitLab Runner which manages the execution of GitLab CI jobs. For each job, a new Runner worker pod is spawned.
- Tainted nodes for dedicated workload

Assumptions
This guide assumes that you have:
- A good understanding of how OpenShift works, and of key Kubernetes components and add-ons.
- A good understanding of how Dagger works. If not, read the Dagger Quickstart.
- A functional OpenShift cluster with the GitLab Runner Operator installed.
- Helm v3.x installed on your local machine to deploy the Dagger Engine on Kubernetes. If not, install Helm.
- The OpenShift CLI (
oc) installed on your local machine to communicate with the OpenShift cluster. If not, install the OpenShift CLI. - A GitLab account or self-hosted GitLab instance. If not, sign up for a free GitLab account.
Step 1: Install the Dagger Engine
Follow the steps below:
-
Create a
values.yamlfile to configure the Dagger Helm deployment. This includes a set of labels for the pod affinity and the taints and tolerations for the nodes.nameOverride: ""
fullnameOverride: ""
engine:
image:
repository: registry.dagger.io/engine
tag: v0.9.7
tolerations:
- effect: NoSchedule
key: builder-node
operator: Exists
affinity:
nodeAffinity:
requiredDuringSchedulingIgnoredDuringExecution:
nodeSelectorTerms:
- matchExpressions:
- key: builder-node
operator: ExistsThis configuration uses the label
builder-node=trueto taint the nodes on which the Dagger Engine should be deployed. -
Execute the following command for each node that is intended to host a Dagger Engine (replace the
NODE-NAMEplaceholder with each node name):oc adm taint nodes NODE-NAME builder-node=true:NoSchedule -
Install the Dagger Engine using the Dagger Helm chart:
helm upgrade --create-namespace --install --namespace dagger dagger oci://registry.dagger.io/dagger-helm -f values.yaml -
Grant the necessary permissions for the
defaultservice account in thedaggernamespace:infoWithout this step, pod creation will fail due to insufficient permissions to execute privileged containers with fixed user IDs and host path volume mounts.
oc adm policy add-scc-to-user privileged -z default -n dagger
Step 2: Configure GitLab Runner
The next step is to configure a GitLab Runner. Follow these steps:
-
Follow the process to obtain a runner authentication token. Note that it is not necessary to register the runner from the command line during this process.
-
Create the configuration for the GitLab Runner as
runner-config.yamlandrunner.yaml. Replace theYOUR-GITLAB-URLplaceholder with the URL of your GitLab instance and replace theYOUR-GITLAB-RUNNER-TOKEN-REFERENCEplaceholder with the token obtained above.kind: ConfigMap
apiVersion: v1
metadata:
name: dagger-custom-config-toml
data:
config.toml: |
concurrent = 10
[[runners]]
environment = ["HOME=/tmp","FF_GITLAB_REGISTRY_HELPER_IMAGE=1"]
name = "OpenShift Prod Runner Dagger"
url = YOUR-GITLAB-URL
executor = "kubernetes"
[runners.kubernetes]
namespace = "dagger"
pull_policy = "always"
privileged = true
[runners.kubernetes.affinity]
[runners.kubernetes.affinity.node_affinity.required_during_scheduling_ignored_during_execution]
[[runners.kubernetes.affinity.node_affinity.required_during_scheduling_ignored_during_execution.node_selector_terms]]
[[runners.kubernetes.affinity.node_affinity.required_during_scheduling_ignored_during_execution.node_selector_terms.match_expressions]]
key = "builder-node"
operator = "In"
values = ["true"]
[runners.kubernetes.node_tolerations]
"builder-node" = ""
[runners.kubernetes.pod_security_context]
run_as_non_root = false
run_as_user = 0
run_as_group = 1001
fs_group = 1001
[[runners.kubernetes.volumes.host_path]]
name = "dagger"
mount_path = "/var/run/dagger"
host_path = "/var/run/dagger"apiVersion: apps.gitlab.com/v1beta2
kind: Runner
metadata:
name: dagger-runner
namespace: dagger
spec:
config: dagger-custom-config-toml
gitlabUrl: YOUR-GITLAB-URL
tags: dagger
token: YOUR-GITLAB-RUNNER-TOKEN-REFERENCE
runUntagged: falseThis configuration uses a similar configuration as that seen in Step 1 for the taints and tolerations and the pod affinity. This ensures that the GitLab Runner worker pods only run on nodes with Dagger Engines.
-
Apply the configuration and deploy the GitLab Runner:
oc apply -f runner-config.yaml -n dagger
oc apply -f runner.yaml -n dagger
Step 3: Create a GitLab CI/CD pipeline
-
For Dagger Cloud users only, add a new CI/CD variable in GitLab with the name
DAGGER_CLOUD_TOKENand set its value to the Dagger Cloud token. This variable will be automatically injected into the GitLab job. -
Create a new GitLab CI/CD pipeline configuration file in your repository at
.gitlab-ci.ymlwith the following content:stages:
- build
.dagger:
image: golang:1.20
tags:
- dagger
variables:
"_EXPERIMENTAL_DAGGER_RUNNER_HOST": "unix:///var/run/dagger/buildkitd.sock"
before_script:
- cd /tmp
- curl -sfL https://releases.dagger.io/dagger/install.sh | DAGGER_VERSION=0.9.7 BIN_DIR=/tmp sh #Dagger version must match version in values.yaml
- export PATH=$PATH:/tmp/
build:
extends: [.dagger]
script:
- dagger versionThe most important sections of this configuration are:
- The
tagsentry, which tells GitLab to use the GitLab Runner which is connected to the Dagger Engine; - The
_EXPERIMENTAL_DAGGER_RUNNER_HOSTvariable, which specifies the socket for the Dagger CLI to use.
- The
Step 4: Run a GitLab CI job
At this point, the deployment is configured and ready for use. Test it by committing a new change to the source code repository, which should trigger the GitLab CI pipeline. Your CI pipelines should now be connected to your Dagger Engines. You can review the job logs either in the GitLab UI under Build->Jobs or within Dagger Cloud.
Conclusion
Use the following resources to learn more about the topics discussed in this guide:
- Dagger on Kubernetes guide
- Dagger GraphQL API reference
- Dagger Go, Node.js and Python SDK references